
One of the key tactics in pickleball is the third-shot drop.
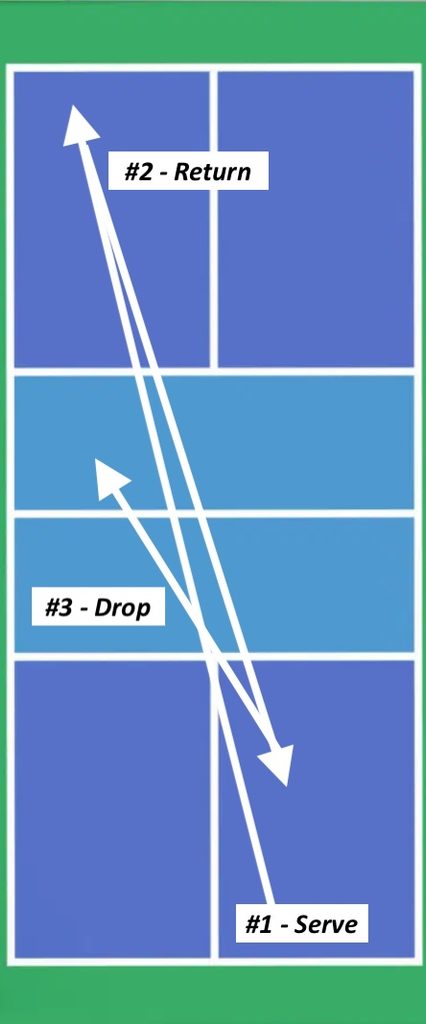
After a serve (the first shot), the receiver waits for the return from the opponent (the second shot), then hits a drop shot into the kitchen (the third shot).
The following drill will help your players learn the technique of techniques and mechanics of the shot, allowing them to practice in a Game-Based environment with Guided Discovery from the coach (or a teammate) and lots of repetition (that provide feedback).
Step #1 – Demonstrate, or have two of your players who know how to execute this pattern, a third-shot drop sequence.
Explain why this tactic is important: it keeps your opponents from being able to return serve, rush the net, and hit a winning volley.
Demonstrate left-handed if you have left-handed players.
Step #2 – Let your players try the tactic. Set up in a normal singles or doubles formation, depending on how many players are doing the drill.
Let players practice, with the server or servers on the North side hitting an easy serve to the receiver on the South side and the receiver hitting an easy shot back beyond the opponent’s (server’s) kitchen line.
For this first rotation, the servers attempt to practice forehand drops. Tell right-handed players to line up closer to the center of the deuce court and left side of the ad court to make it easier and more likely to get forehands.
North side servers practice three times/points, returning drops crosscourt. Do NOT play out the point after the third-shot drop.
South side returners don’t serve or practice drops, yet.
Step #3 – After the North side players (servers) practice three drops crosscourt, play three more points, with the North side server practicing three drops straight ahead (e.g., the server in the deuce court drops to the ad court, directly in front of her).
Step #4 – Players switch sides (not ends) of the court (deuce and ad), with the North side servers continuing to practice three forehand drops crosscourt, then three drops straight ahead, for a total of 12 practice drops before the South side receivers become the servers and practice their 12 attempts.
Step #6 – Repeat the 12-point rotation, with the North side players receiving and the South side players serving.
Step #7 – Repeat the two, 12-point rotations with backhand third-shot drops. Have players cheat to the middle and side of the court when serving.
Step #8 – As with every Game-Based drill, break for a learning circle to let the players discuss the best ways to hit a third-shot drop. Provide the answers you want them to have (regarding technique) if none of the players volunteer them.
Step #9 – Repeat the drill, using the same rotations, so the players can try again using their new technique tips.
If you wish, you can first bring out your basket and feed balls from the baseline to your players (crosscourt using forehand and backhand feeds if you’re feeding from the middle of the court to simulate serve directions), letting them practice drops without having to serve.
Step #10 – Finish the practice playing out points (playing skinny singles crosscourt if you have more than two players on the court). Two crosscourt points can be played by four players at the same time.
Rotation Tip #1 – If you have six players per court, have the three players on each side of the court, with one player on deck at the back fence. After each six-shot rotation on one side of the court (deuce or ad), the third player rotates in clockwise and one of the original two players rotates out to the back fence.
Rotation Tip #2 – If you have eight players per court, have the four players on each side of the court, with two players on deck at the back fence. After each six-shot rotation on one side of the court (deuce or ad), the third and fourth players rotate in and the original two players rotates out to the back fence. The two players on deck switch sides (deuce and ad) and come back to the side they haven’t played, yet.
Technique Tip #1 – Tell servers to stay back after the serve. If they come into the court and receive a deep return, they’ll have to move backward and try their drop with their weight going backward.
Technique Tip #2 – Tell your players to keep their wrists firm or locked during the stroke in order get better control. Have them use a fairly loose grip, rather than a death grip on the handle.
Technique Tip #3 – Tell your players move the paddle forward by having them use their shoulder to drive the arm forward, rather than bending the arm at the elbow, flipping the paddle upward. Move forward, not upward.
Technique Tip #4 – Make sure your players are using a short swing, with no backswing, if possible. After the serve, if they are planning a drop, they should keep their paddles near their hip, moving the arm forward only for the drop–not taking a big backswing.
This might telegraph a drop, so have your players practice taking a backswing, then during the forward swing, stopping slightly at the hip, then hitting the drop with the shoulder push movement.
Technique Tip #4 – Have your players take the return on the rise, getting close to it and bumping it back with the short swing and shoulder-forward motion.
Technique Tip #5 – Make sure your players make contact well in front of their bodies, with their elbows in, close to their bodies.
Technique Tip #6 – Most groundstrokes are hit with a square or semi-open stance, with the weight on the leg opposite the paddle side (off the left leg for right-handers).
Have players practice both ways (with their weight on each leg) to see which works best for them.
Technique Tip #7 – If a player keeps hitting balls long or popping them up, have him practice purposely hitting balls into the net (near the top of the net). After three tries, have him try to add just a bit more height and depth.
This will help him move the apex of the ball back, eventually helping him hit balls short into the kitchen, in front of his opponents.